If you’re new to Excel, you’ll benefit most from a quick tour of Excel, including how you start Excel, work with its windows, and create and save a workbook. That’s what we’ll do here.
Starting Excel
You can start Excel either by starting the program directly or by opening an existing Excel workbook. To start Excel directly, click the Start button, choose Programs, and then choose Microsoft Excel. When you do this, Excel starts and opens a blank workbook.
To open an Excel workbook—which indirectly starts Excel—you can double-click an Excel workbook file (which has an icon with a green x and, if you’re viewing file extensions, has the extension .XLS) in the My Computer or Windows Explorer window.
If you’ve recently used the file, you can also open it from the Documents menu by clicking the Start button, choosing Documents, and choosing the Excel file you want to open. When you do this, Excel starts and opens the workbook you selected.
Working with the Excel Windows
The Excel program looks and works very much like other Microsoft application programs and especially Microsoft Office programs.
Reviewing Excel’s Geography
When you start Excel, the Excel program displays the Excel application window, or program window. Inside this application window, Excel typically displays one or more document windows, or workbook windows.
Each document window, or workbook window, displays an Excel workbook. An Excel workbook is a stack of worksheets. A worksheet is essentially a grid, or table, which you enter data.
Figure 2-1 shows how your screen looks after you start Excel and includes some callouts to point out features of the Excel program window and workbook window that may be new to you.
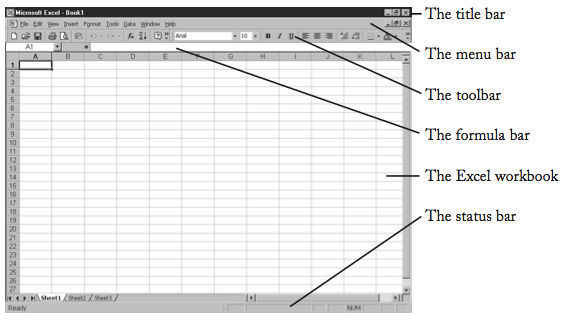
The program window is the rectangle in which the Excel program displays its information. The Microsoft Excel title bar and menu bar appear at the top of the program window. The toolbar or toolbars, located just below the menu bar, provide a series of buttons that allow for faster selection of frequently used menu commands.
The formula bar displays the data you enter in your worksheet. At the bottom of the application window, the status bar displays a variety of messages, such as “Ready.” The Excel workbook document appears in the area between the formula bar and the status bar.
When you start Excel, it automatically opens an empty workbook file called Book1 that contains three pages, or worksheets. These pages are indicated by the tabs Sheet1, Sheet2, and Sheet3 at the bottom of the window.
In a worksheet, the letters of the alphabet identify each of the 256 columns. Excel uses double letters for columns 27 through 256.
The left edge of the document window identifies each row in your worksheet using numbers. An Excel worksheet can have up to 65,536 rows.
The intersection of a column and row is called a cell. Each cell has an address, called a reference, consisting of the column letter and row number. For example, the cell in the top left corner of the worksheet is cell A1.
A dark outline called the cell selector identifies the active cell. Figure 2-1 shows the cell selector in cell A1. The reference of the active cell also appears on the left side of the formula bar in the Name box. If you type a number and press Enter, Excel places the number in the active cell.
Moving Around a Workbook
With three (or more) sheets, 256 columns, and 65,536 rows, an Excel workbook is so large that only a small area is visible on-screen at one time. Not surprisingly, Excel provides several ways for you to view different portions of the workbook displayed in the program window:
- With the mouse, you can use the vertical and horizontal scroll bars along the right and bottom edges of the document window to move through your worksheet. Just click inside the scroll bars to move one screen at a time. Click the scroll bar arrows to move one row or column.
- With the mouse, click a sheet tab to move to that worksheet in the workbook.
- The standard navigation keys, Page Up and Page Down, move through your worksheet one screen at a time. When you hold down the Ctrl key and press Page Up or Page Down, you move to the next or previous worksheet.
- The arrow keys move up and down, right and left one cell at a time. You can also move to the right one cell by pressing the Tab key and to the left one cell by holding down the Shift key while pressing Tab.
- To move directly to a specific cell, you can enter that cell’s name in the Name box and press the Enter key. (The Name box is located at the left end of the formula bar.) You can also choose the Edit menu’s Go To command. When you choose this command, Excel displays the Go To dialog box. You can enter a cell reference in its Reference text box and then click OK to move to the cell.
Finding Help When You Need It
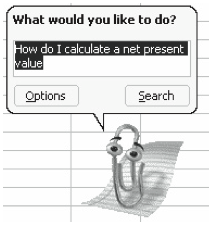
Microsoft Excel, like other Microsoft Office programs, provides an animated character called the Office Assistant to answer any questions you may have. If you see the Office Assistant on your screen, click it to ask it a question. If you don’t see the Office Assistant, choose the Help menu’s Show The Office Assistant command. The Office Assistant displays a balloon you can use to enter your question, as shown in Figure 2-2. Just type your question, and click Search. The Office Assistant displays a list of topics related to your search. Click a topic to display the Microsoft Excel Help window with details on the topic you chose.
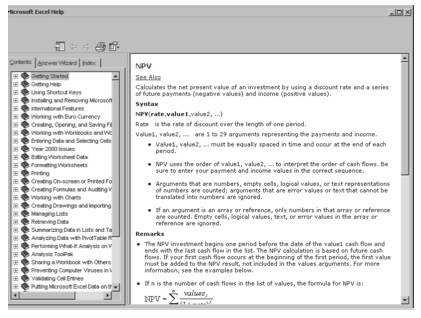
If the Help window doesn’t answer your question, click its Show button. This displays the Contents, Answer Wizard, and Index tabs (see Figure 2-3). Use the Contents tab to navigate through the help file the way you would navigate through a book by using its table of contents. Use the Answer Wizard tab to ask a question in a manner similar to the way in which you ask the Office Assistant a question. Use the Index tab to look up a keyword or phrase the way you would look up a word in a book’s index.
Creating a Simple Workbook
To use Excel, you simply enter labels, values, and formulas in the cells of your worksheets. To construct a simple budgeting worksheet, for example, you would enter a handful of labels, values, and formulas.
Entering Labels
Labels are simply any information entered in a worksheet that you don’t want to manipulate arithmetically. They often identify the values that are subject to calculation, so you normally enter them as the first stage in setting up a worksheet. Usually, labels are pieces of text, such as the expense categories in a budgeting worksheet or the employee names in a payroll worksheet. However, they can also be numbers that won’t be used arithmetically, such as telephone numbers or part or project ID numbers.
To enter a label, follow these steps:
- Move the cell selector to the desired location.
You can do this by clicking the cell, using the navigation keys to move the cell selector, or using the Name box. - Type the label.
As you do, Excel displays what you type in the formula bar. It also adds the Enter button (the one that looks like a check mark) and the Cancel button (the one that looks like an X) to the formula bar. - Set the label in the cell.
You can do this by pressing the Enter key, clicking the Enter button on the formula bar, or moving to another cell.
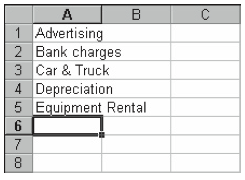
Figure 2-4 shows a simple workbook fragment with just a handful of labels. Notice that Excel aligns text to the left edge of each cell and allows long labels to spill over into adjacent cells if they are unoccupied.
Entering Value
Values are numbers you want to add, subtract, multiply, divide, or otherwise manipulate in formulas. In a budgeting worksheet, for example, you would enter the budgeted amounts as values. Figure 2-5 shows the values, or amounts, entered beside each of the worksheet labels.
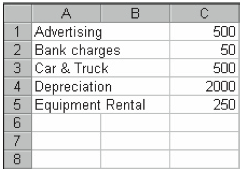
To enter values, use the ten number keys either on the main keyboard or on the numeric keypad. To use the numeric keypad, the Num Lock key must be selected. Use the period key to show decimal places and the hyphen key to identify negative values.
To enter values, use the same three-step process as you do to enter labels. For example, to enter the value 500 shown in cell C1, follow these steps:
- Move the cell selector to the desired cell.
In Figure 2-5, for example, you move the cell selector to C1 to enter the first value. You might do this by clicking. - Type the value.
As you type, Excel displays the number in the formula bar. It also adds the Enter and Cancel buttons to the formula bar. - Set the label in the cell.
As with setting a label, you can do this by pressing the Enter key, clicking the Enter button on the formula bar, or moving to another cell.
To enter the rest of the values shown in Figure 2-5, repeat the steps above for each value.
If a value is too large to fit into a single cell, Excel either increases the cell width or displays the cell contents using scientific notation. The number 123456789, for example, may appear as something like 1.2E+08 or 1.235E+08, depending on the width of the cell. Likewise, the number .0000001 may appear as something like 1E-07.
Correcting Typing Mistakes
Excel cells work like the text boxes you see elsewhere in Windows. This means that it’s easy to correct any typing mistakes you make. If you make typing mistakes before setting a label or value in a cell, for example, you can use the Backspace key to erase characters to the left of the insertion point (the cursor) and then retype the correct data. You can also reposition the insertion point in the formula bar with the arrow keys and erase characters to the right with the Delete key. If you don???t want to enter the data shown on the formula bar in the active cell, click the Cancel button or press the Esc key.
If you make a mistake but don’t realize it until you set the label or value in the cell, move the cell selector to the cell with the erroneous content. To replace the cell’s contents entirely, enter a new label or value. To edit the cell’s contents, either click the formula bar or doubleclick the cell. Use the Backspace key to erase characters to the left of the insertion point and then retype the correct data (or reposition the insertion point with the arrow keys, erase characters to the right with the Delete key, and then retype the correct data). When the formula bar or editable text box over the cell shows the correct label or value, set it in the active cell by moving the cell selector to another cell, pressing the Enter key, or clicking Enter in the formula bar.
Saving and Opening Workbooks
To save the work you do with Excel, you save the workbooks you create. To later reuse a workbook, you open it. Neither task is difficult if you’ve worked with Windows a bit.
Saving Your Work for the First Time
When you first save a workbook, you must give it a name and tell Excel where to store it. If you’ve worked with other Windows programs, you’ll find the procedure quite familiar. To save a workbook for the first time, follow these steps:
- Choose the File menu’s Save As command.
Excel displays the Save Asdialog box (see Figure 2-6).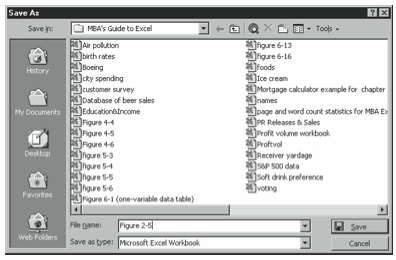
Figure 2-6. The Save As dialog box. - Choose a folder location for the new workbook.
To save the file in a common location for documents, click one of the icons on the left side of the Save As dialog box. For example, to save the file to the Windows desktop, click the Desktop icon. If you have Windows 95 or 98, click the My Documents icon to save the file to the default storage location for Office documents. (If you have Windows NT, click the Personal icon.) To save the file to a location other than one designated by an icon (such as a network drive), use the Save In drop-down list box and the large list box below to select the drive and folder location. - Name the workbook.
Enter a name for the file in the File Name text box. You don’t need to add a file extension—Excel automatically does this for you. Excel allows you to enter very long filenames if you want, but if you do use long names, make sure that the first few characters clearly identify the workbook so it is easy to find later on. - Select a file format from the Save As Type drop-down list box.
If you’re the only one who will be using the file, you can accept the default, Microsoft Excel Workbook. If you’ll be sharing the file with other people, select the format they’ll be using or select a format that both you and any other user can read, such as a tabdelimited or comma-delimited file. - Click Save.
Excel saves the file in the specified location and format using whatever name you choose.
Resaving Your Work
To save a file again and replace the previous file, click the Save toolbar button or choose the File menu’s Save command. To save a file under a different name, in a different location, or in a different format, and retain the previous file, choose the File menu’s Save As command. Use the Save As dialog box to specify a new name, location, or format.
Opening Workbooks
To open a workbook, follow these steps:
- Click the Open toolbar button.
Excel displays the Open dialog box (see Figure 2-7).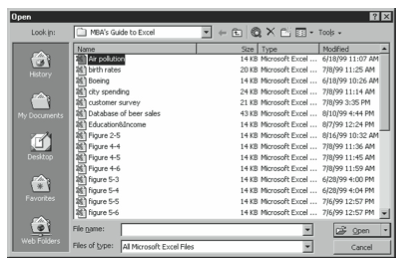
Figure 2-7. The Open dialog box. - Open the folder storing the file.
Use the icons along the left side, the Save In drop-down list box, and the list box of folders and files to locate the file. - Select the workbook.
After you find the workbook you want to open, select it by clicking it. - Click Open.
Excel retrieves the file from the specified location and displays it in another document window inside the Excel program window.
Leave a Reply