Excel provides you with a wide variety of printing and presentation options, which is fortunate. As you move beyond the work of collecting and analyzing quantitative information, you’ll usually want to share your information with others—typically by printing it.
Tip: If you want to print a worksheet immediately without specifying print settings (this technique tends to work fine for small, simple worksheets), just click the Print toolbar button.
Setting Up Pages
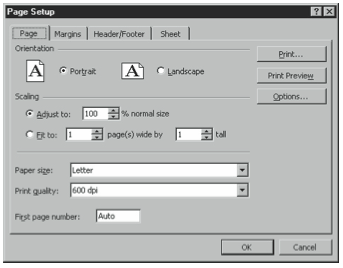
The Page Setup dialog box, shown in Figure 2-34, gives you precise control over how your worksheet will print. Click the Setup button in the Print Preview window or choose the File menu’s Page Setup command to display the dialog box.

The Orientation option buttons allow you to select either the standard portrait or a horizontal landscape orientation for your printed worksheet pages. Use the Adjust To Scaling options to reduce or enlarge the worksheet proportionally, or use the Fit To Scaling options to fit the worksheet onto the number of pages you specify. Use the Paper Size drop-down list box to specify the size of paper you’re using and the Print Quality drop-down list box to select the printer resolution. Higher print-quality settings, of course, look crisper and are more legible, but they take more time and toner to print. The maximum print quality setting you have available depends on your printer’s capabilities.
Click the Margins tab, and use the Margins text boxes to enter the area in inches that you want to leave around the outside edges of the paper and between the spreadsheet and any header or footer. Use the Center check boxes to center your printed worksheet horizontally or vertically between the margins you specify.
Click the Header/Footer tab, and select a common header or footer from the Header And Footer drop-down list box. If you want to create your own header or footer, click Custom Header or Custom Footer and use the dialog box Excel displays to enter the header or footer text.
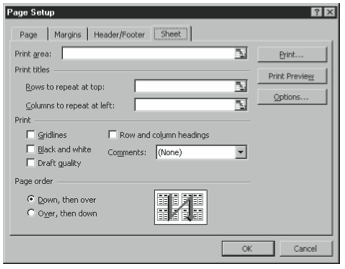
Click the Sheet tab (shown in Figure 2-35) to specify the print area, as well as any rows or columns you want to repeat on every page of a worksheet as titles. Select the Gridlines check box to print the gray worksheet gridlines that you see onscreen. Select the Black And White check box to print colors as black and white. Select the Draft Quality check box to print a fast, low-quality copy without most graphics. Select the Row And Column Headings check box to print the column letters and row numbers. Use the Comments drop-down list box to tell Excel if you want to print comments, and if so, where you want the text to appear on the printed page. Use the Page Order option buttons to specify the order in which multiple pages print.

Previewing Before You Print
Previewing lets you see how a printed worksheet will look before you print it. When you preview a worksheet, for example, you can see how many pages it takes to print and whether or not all of the text fits as you think it does.
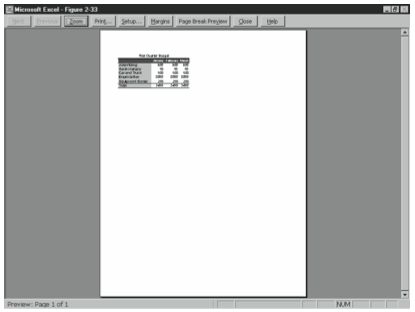
To preview a worksheet, click the Print Preview toolbar button or click Preview in the Print dialog box to display the Print Preview window (see Figure 2-36).

The Next and Previous buttons allow you to page back and forth through a multipage worksheet. Click Zoom to zoom in on a page. Click Print to display the Print dialog box. Click Setup to display the Page Setup dialog box.
Click Margins to view the header, footer, and page margins. You can change these margins in the Print Preview window by dragging them. Click Page Break Preview to exit Print Preview and view the worksheet in Page Break Preview view. To change page breaks in Page Break Preview view, drag the breaks. To return to Normal view, choose the View menu’s Normal command.
Click Close to go back to the regular application window. After you view a worksheet in Print Preview, Excel displays the page breaks in the worksheet as dotted lines.
Printing Workbook Pages
You have two options for printing worksheets: If you want to use Excel’s default print settings, just click the Print toolbar button. If you want to specify print options, follow these steps:
- If you want to print only a specific area of a worksheet, select that area.
The easiest way to do this is by clicking and dragging the mouse. - Choose the File menu’s Print command.
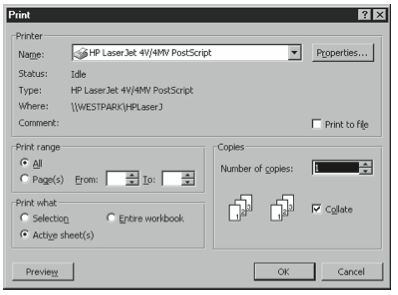
Excel displays the Print dialog box, as shown in Figure 2-37.
Figure 2-37. The Print dialog box. - Specify which pages you want to print.
If a single worksheet is larger than one printed page, use the Print Range options to specify whether you want all pages or only some pages to print. - Specify what portion of the workbook you want to print.
Use the Print What option buttons to tell Excel whether you want to print only the cells you selected, only the worksheet you currently have displayed, or all of the worksheets in the workbook. - Specify how many copies Excel should print.
Use the Number Of Copies box to tell Excel how many copies you want to print. Select or clear the Collate check box to specify the order in which pages of multiple copies should print.
Note: The Print dialog box also lets you print to a file. When you print to a file, other people can print the file even if they don’t have Excel. All they need to do is copy the file to their printer port. - Click OK.
Excel prints the workbook according to your specifications.
Leave a Reply