Excel 2000 provides a special command—the File menu’s Save As Web Page command— for creating a web page version of an Excel workbook. You can also use the Save As Web Page command for creating interactive spreadsheet components for web pages. The paragraphs that follow describe how you do both of these things—and also explain why you will rarely want to do either.
Creating a Web Page Version of an Excel Workbook
Excel lets you use HTML as the format for your Excel workbooks. What this means is that you can create Excel workbooks that can both be opened and edited by Excel in almost the usual way and viewed using your web browser. (If an Excel workbook is viewed with a web browser, you can’t edit the workbook data except in very limited circumstances, as described later in the section “Creating an Interactive Spreadsheet Component.”)
Before I describe the steps for saving an Excel workbook using the web page, HTML format, let me say that you don’t want to use HTML as the default format for your workbooks. Much workbook information is lost and much workbook functionality is sacrificed when you use the HTML file format.
To create a web page version of an Excel workbook, follow these steps:
- Choose the File menu’s Save As Web Page command.
Excel displays the Save As dialog box (see Figure 7-18).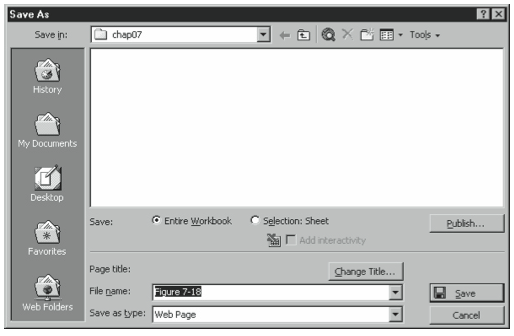
Figure 7-18. The Save As dialog box. - Name the web page.
Click the File Name box, and enter the filename you want to use for the web page. - Verify that the Save As Type box indicates the file format is Web Page, or HTML.
Excel lets you use either its standard binary file format, indicated by the .xls file exten- sion, or its new web page format, indicated by the .htm file extension. When you save a workbook as a web page, predictably, you use the web page format. - Specify where you want the web page saved.
Use the navigation bar’s clickable icons to open the folder location where you want to save the web page. Most often, you click the My Documents icon so that Excel opens your My Documents folder. You can also click the Web Folders icon so that Excel dis- plays a list of web folders to which you can add files. - Click Publish to create the web page.
When you click Publish, Excel creates an HTML, or web page version, of the workbook in the specified location.
Once you create the web page, you can view it using your web browser. Or, you can open the web page using Excel and then make the same general changes you make to any Excel workbook.
Creating an Interactive Spreadsheet Component
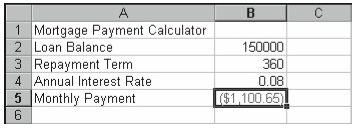
Excel also lets you take Excel worksheets or worksheet ranges and convert them into min- iature spreadsheet objects that can be placed in web pages. These interactive spreadsheet components allow people to view the web page with their web browser. Figure 7-19, for example, shows a simple mortgage calculator workbook. Figure 7-20 shows a web page with a simple interactive spreadsheet component, which is actually the worksheet range A1:B5 from the workbook shown in Figure 7-19.
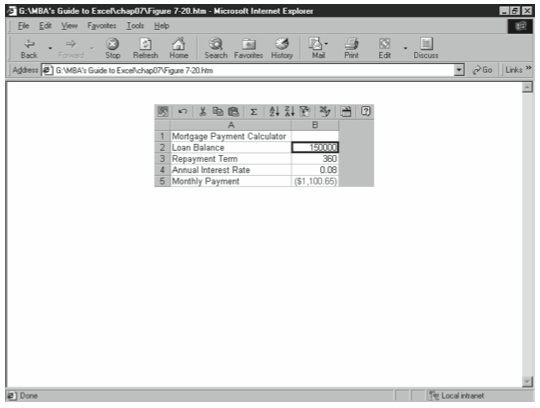
The unique feature of an interactive spreadsheet component is that when you view the component using Microsoft Internet Explorer version 4.1(or a later version), you can make modest changes. In Figure 7-20, for example, if you enter a new interest rate, the interac- tive spreadsheet component calculates a new monthly mortgage payment.
In general, interactive spreadsheet components resemble Excel workbooks in their mechan- ics. Note, however, that someone familiar with Excel will need to experiment a bit in order to become proficient with interactive spreadsheet components.
As with Excel web pages, however, interactive spreadsheet components allow for only a sub- set of Excel’s functionality. And, in fact, by using interactive spreadsheet components, you get only a very modest portion of Excel’s functionality. What’s more, for someone to use interac- tive spreadsheet components, the person must already have installed the Standard, Professional, or Premium version of Microsoft Office 2000 and the Office Web Components.
Accordingly, one has to wonder when interactive spreadsheet components would ever be the preferred method for sharing Excel data. Any time you can successfully share data us- ing an interactive spreadsheet component, you’ve always got a superior solution that the recipient presumably already knows how to use: Excel.
Nevertheless, creating interactive spreadsheet components is easy. To create an interactive spreadsheet component, first select the worksheet range that you want to use as an interactive spreadsheet component. Then follow these steps:
- Choose the File menu’s Save As Web Page command.
Excel displays the Save As dialog box (see Figure 7-21).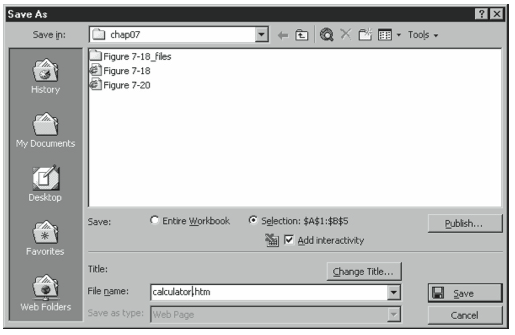
Figure 7-21. The Save As dialog box filled out to create an interactive spreadsheet component. - Click the Selection option button.
This tells Excel you want to create a web component for the selected portion of the workbook. - Select the Add Interactivity check box.
This tells Excel you want to create an interactive web component for the selected por- tion of the workbook. - Name the web page.
Click the File Name box, and enter the filename you want to use for the web page. - Specify where you want the web page saved.
Use the navigation bar’s clickable icons to open the folder location where you want to save the web page. Most often, you click the My Documents icon so that Excel opens your My Documents folder. You can also click the Web Folders icon so that Excel dis- plays a list of web folders to which you can add files. - Optionally, give the web page a name.
If you click the Change Title button, Excel displays a dialog box you can use to name the web page. This web page name appears on the title bar of the web browser. - Click Publish to create the web page.
When you click Publish, Excel displays the Publish As Web Page dialog box (see Figure 7-22).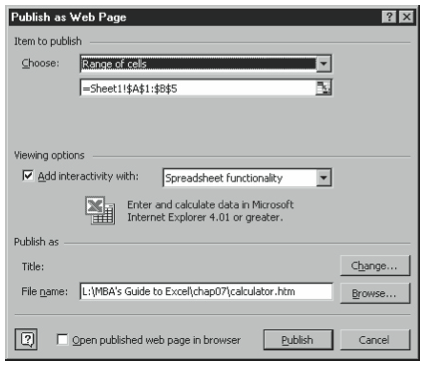
Figure 7-22. The Publish As Web Page dialog box. - Verify the worksheet selection.
Review the Choose boxes to confirm that these correctly identify the worksheet selec- tion you want to publish as an interactive spreadsheet component. Edit the contents if needed. - Verify the form of interactivity.
Confirm that the Add Interactivity With check box shows the correct form of interactivity. For example, if you’re creating an interactive spreadsheet component, the list box should show Spreadsheet Functionality. - Verify the filename.
Confirm that the file pathname shows in the File Name box. If the correct file pathname doesn’t show in the File Name box, edit the contents as needed. - Publish the interactive spreadsheet component.
Click the Publish button.
Leave a Reply