Most of the earlier sections of this chapter presuppose you use Excel to create data you then pass along to other programs and people. While many people are very likely to use Excel in this way, you may use Excel to retrieve data created or stored by some other program.
In the final pages of this chapter, then, I’ll briefly explain how to use Excel to collect external data so you can exploit Excel’s analytical power to examine the data. Specifically, the chapter discusses two tools: Excel’s Import Wizard and its Get External Data commands.
Importing Textual Data into Excel
Excel lets you easily import textual data into an Excel workbook. This capacity may not sound interesting, but it means that anything you can get as a text file—such as a financial report generated by the mainframe accounting system—can be imported into Excel and then examined.
To import a text file into Excel, follow these steps:
- Open the text file.
Using the File menu’s Open command, tell Excel that you want to open the text file. When Excel displays the Open dialog box, select the All Files item or the Text File items in the List Files Of Type box so that your text file is listed. Once you find the file, click it and then click the Open button. Excel displays the first Text Import Wizard dialog box (see Figure 7-23).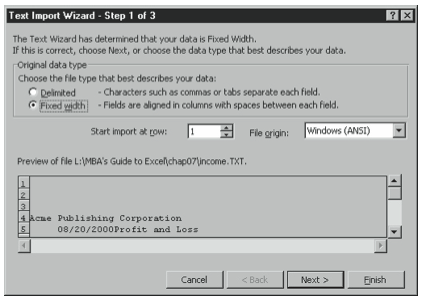
Figure 7-23. The first Text Import Wizard dialog box. - Indicate whether the file uses the fixed-width format or delimiting characters.
Use the Original Data Type option buttons—Fixed Width or Delimited—to indicate whether the file uses a fixed-width format, which is the same thing as a straight text file, or uses delimiting characters. Excel can usually guess correctly about which format your text file uses, by the way, so if you’re not sure which option to select, accept Excel’s de- fault suggestion. - Indicate the first row that should be imported.
Use the Start Import At Row box to indicate which row of the text file is the first row you want to have imported. For example, you might not want to import reader header and title information, and might instead want only to begin importing the first row with the data. - Identify the file origin.
Use the File Origin box to identify the source of the file. If you’re importing data cre- ated by another Window’s program, select the Windows (ANSI) entry from the File Origin box. If you’re importing data from a mainframe, select the MS-DOS (PC-8) entry from the File Origin box. - Verify the fixed-width assumptions or delimited character assumptions made by Excel.
Once you finish with the first Text Import Wizard dialog box, you click Next. Excel then displays the second Text Import Wizard dialog box. If you’re importing a fixed-width file, Excel displays the dialog box shown in Figure 7-24. You use this dialog box to verify how Excel breaks the text file into columns. You can create new break lines by clicking. You can remove an existing break line by double-clicking. You can also move an exist- ing break line by dragging.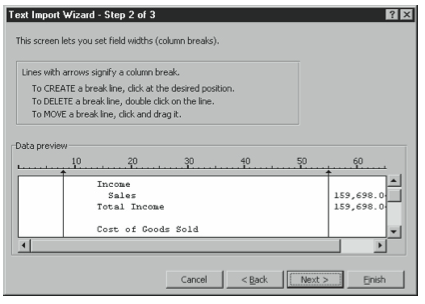
Figure 7-24. The second Text Import Wizard dialog box if you’re importing a fixed-width file. If you’re importing a delimited character file, Excel displays the dialog box shown in Figure 7-25. You use this dialog box principally to verify that Excel has correctly identified the delimiter: The checked Delimiters box should identify the delimiter. You can also indi- cate if the text file uses a character (such as a quotation mark) to identify text. Note that you can tell whether Excel’s delimiter assumptions correctly describe the text file because the preview box shows how your data look given the delimiter specifications.
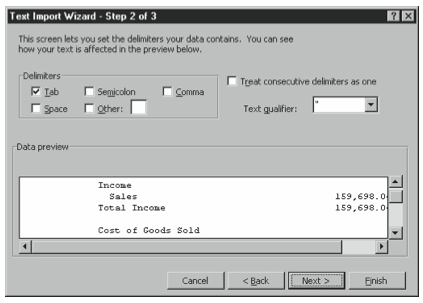
Figure 7-25. The second Text Import Wizard dialog box if you’re importing a fixed-width file. - Select formatting for each column.
After you’ve verified the fixed-width or delimited character assumptions of Excel—and fixed any incorrect assumptions—click Next. Excel displays the third Text Import Wizard (see Figure 7-26). You use this dialog box to specify the formatting assumptions Excel should make about the to-be-imported text file.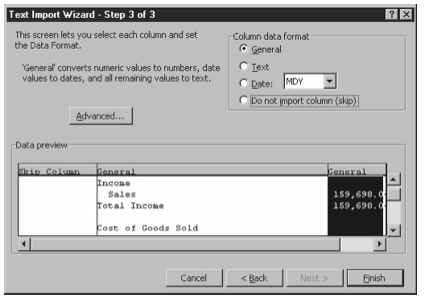
Figure 7-26. The third Text Import Wizard dialog box. Excel also guesses about the default formatting that it should use for each column of the text file you import. You should verify that each column uses the best default formatting. To change a column’s format, click the column header and then the appropriate Column Data Format button. If you don’t want to import a column, click it and then click the Do Not Import Column option button.
- Click Finish when you’re finished.
Excel imports the text file into a new, blank, open workbook. At this point, you’re ready to begin cleaning up the data so you can start working with it.
Using the Get External Data Commands
Excel, through the commands on the Get External Data submenu, provides tools that you can use to retrieve data from external data sources, such as from a database. Some of these tools are quite easy to use. And others require you to be proficient in the language and struc- ture of databases. I’m not going to describe how to use all of these tools in detail here. I will, however, describe how you use the most common of these tools, including the Query Wizard. And I’ll also discuss each of the tools so you know just what Excel is capable of and about features you may want to explore in more detail.
Importing Text Files
If you choose the Data menu’s Get External Data command and then choose the Get External Data submenu’s Import Text File command, Excel lets you identify a text file you want to import. Once you’ve identified this text file, Excel starts the same Text Import Wizard described in the previous section, “Importing Textual Data into Excel.”
When you use the Import Text File command, however, Excel does one thing differently from starting the Text Import Wizard from the File menu’s Open command. When you use the Import Text File command, Excel maintains a link to the original text file by using external references. This means that if you want to re-import the text file—perhaps because the data has changed—you can easily do so. To re-import the data, click the Refresh All toolbar button on the External Data toolbar.
Using the Query Wizard
Excel’s Get External Data submenu provides access to the Query Wizard, which is the tool you’ll most often use to retrieve external data. The Query Wizard, in effect, provides an interface you use from inside Excel to query an external database.
The Query Wizard works with most common databases. Excel provides database drivers for connecting to most (perhaps all) of the popular database engines, including the Microsoft Access 2000, Excel, FoxPro, and SQL Server products; and the third-party database prod- ucts dBase, Oracle and Paradox.
If you want to retrieve information from an external database that isn’t on the list contained in the preceding paragraph, you can still retrieve data from the database. For example, al- most surely, you can use the database program to create a text file that holds the informa- tion you want to query. And you may also be able to create database files, or tables, that use a format that mimics one of the databases listed.
To use the Query Wizard, follow these steps:
- Open a blank workbook.
Excel places the external data you retrieve in the open workbook. This means you’ll prob- ably want to start with a blank open workbook. If you want to place the data in an exist- ing workbook, make sure you’ve got an empty worksheet on which to store the data. - Start the Query Wizard.
To start the Query Wizard, first choose the Data menu’s Get External Data command. When Excel displays the Get External Data submenu, choose the New Database Query command. Excel displays the Choose Data Source dialog box (see Figure 7-27).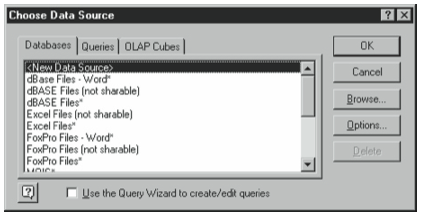
Figure 7-27. The Choose Data Source dialog box. - Indicate you want to use the Query Wizard.
Check the Use The Query Wizard To Create/Edit Queries box to indicate you’ll use the Query Wizard. - Indicate the data source from which you’ll retrieve the data.
To select the data source from which you want to retrieve data, first click the Databases tab. Then select the type of database from which you’ll retrieve data. For example, if you’re retrieving data from a nonshareable dBase database, click the dBase (not sharable) en- try in the list box. Click OK after you’ve selected your data source. The Query Wizard displays the Choose Columns dialog box (see Figure 7-28).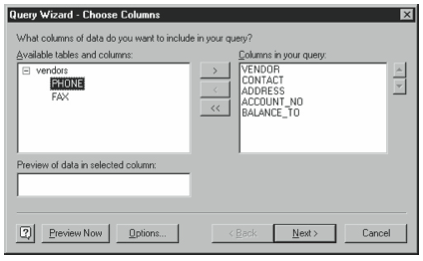
Figure 7-28. The Choose Columns dialog box. - Select the table or tables that you want to query.
When Excel displays the Choose Columns dialog box, use the Available Tables And Columns list box to select the tables and columns, or fields, that you want to import. To see the columns that a table uses, click the plus symbol next to the table name. - Select the columns that you want to retrieve.
Using the Choose Columns dialog box, select the columns you want to retrieve. To se- lect a column, click the column and then click the Add button. The Add button shows a single arrow pointing to the Columns In Your Query list box. To remove a column from the Columns In Your Query list box, click the column and then click the Remove but- ton, which shows a single arrow pointing to the Available Tables And Columns List box. To start over, click the Remove All button, which shows a double arrow pointing to the Available Tables And Columns List box. When you finish selecting the columns you want to retrieve, click the Next button. The Query Wizard displays the Filter Data dialog box (see Figure 7-29).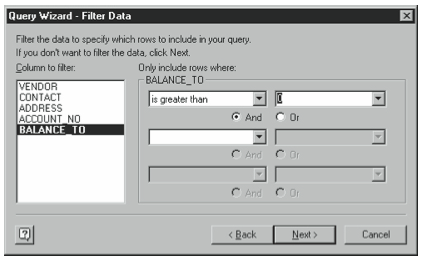
Figure 7-29. The Filter Data dialog box. - Describe the data the Query Wizard should retrieve.
To describe the data you want to retrieve, use filters based on the columns, or fields, that you’re querying. To create a filter, select the column you want the query to examine. Then use the Only Include Rows Where boxes and buttons to indicate how this column is examined. Figure 7-29, for example, shows a filter that looks at the BALANCE_TO column to see whether this value is greater than or equal to 0. The first drop-down list box in the Only Include Rows Where area provides other logical operators you can also use. If you want to create a filter based on more than one comparison of the same col- umn, use the And and Or option buttons and the next row of boxes. If you want to cre- ate a filter based on another column, select the column from the Columns To Filter list box and then repeat the preceding steps. When you finish specifying the filters you want to use, click Next. The Query Wizard displays the Sort Order dialog box (see Figure 7-30).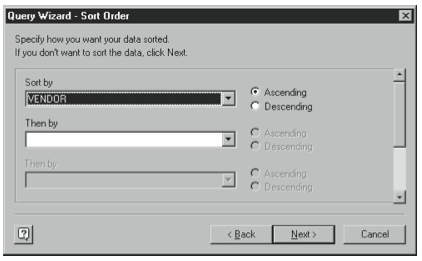
Figure 7-30. The Sort Order dialog box. - Select a sort order for the retrieved data.
When Excel displays the Sort Order dialog box, use the Sort By box and the Ascending and Descending option buttons to indicate how the retrieved data should be arranged in your worksheet. If some of the records, or rows, will use the same first sort key—this is what you specified using the Sort By box—you can provide a second sort key using the first Then By box and buttons. You can also provide additional sort keys using the other Then By box and buttons. When you finish specifying the sort order, click the Next button. The Query Wizard displays the Finish dialog box (see Figure 7-31).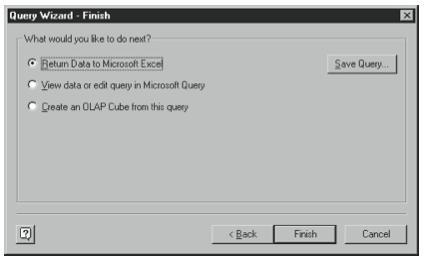
Figure 7-31. The Finish dialog box. - Tell the Query Wizard where you want to place the data that the query returns.
When the Query Wizard displays the Finish dialog box, use the What Would You Like To Do Next option buttons to select a location for the data. Presumably, you want to place the retrieved data in an Excel worksheet so you can use Excel’s analytical tools to exam- ine the data in ways that the database program doesn’t allow. To do this, click the Re- turn Data To Microsoft Excel button. Then click Finish. Excel runs the query and asks where the retrieved data should be stored using the Returning External Data To Microsoft Excel dialog box (see Figure 7-32).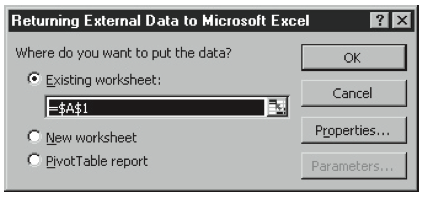
Figure 7-32. The Returning External Data To Microsoft Excel dialog box. - Select a location for the retrieved data.
When Excel asks where the retrieved data should be placed, use the Where Do You Want To Put The Data option buttons to select a location for the data: in the open workbook at the location of the cell selector, in a new workbook, or in a PivotTable report. Then click OK. Excel places the data in the indicated location.
After you place the retrieved data in an Excel workbook, you can begin to work with the data using Excel’s features. You can use statistical functions to look closely at the data’s characteristics, for example. And you can use charts to view and present the data visually.
The External Data toolbar, which Excel will probably display, provides several toolbar buttons you’ll find useful, too. The Edit Query button, for example, restarts the Query Wizard so you can change the query. The Data Range Properties button displays the External Data Range Properties dialog box, which you can use to change the way that Excel handles the dataitretrievesinthequery.TheQueryParametersbuttonletsyoudescribehowanyquery parameters are handled in the query. The Refresh Data button reruns the query to retrieve any new data. The Cancel Refresh button stops a refresh you might have started. The Re- fresh All button reruns all the queries in a workbook. Finally, the Refresh Status button displays a dialog box that reports information such as how long a refresh operation took.
Running a Web Query
The Get External Data submenu provides a Web Query tool that you can use to retrieve tabular data from a web page. To run a simple web query, open a blank workbook, choose the Data menu’s Get External Data command, and then choose the Get External Data submenu’s New Web Query command.
If you choose the New Web Query command, Excel displays the New Web Query dialog box (see Figure 7-33). To use the New Web Query dialog box, click the Browse button and then open the web page with the table from which you want to retrieve information. Once you’ve displayed this web page, return to Excel by clicking the Excel taskbar button. As this point, you can click OK and Excel will retrieve the table data. When Excel asks where the data should be placed using the Returning External Data To Microsoft Excel dialog box (see Figure 7-32), indicate the appropriate location.
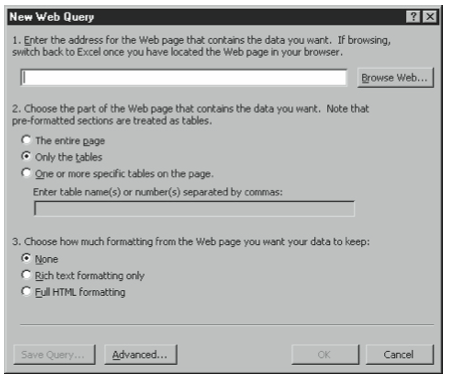
You can use the other option buttons in the New Web Query dialog box to attempt to control what data the Web Query tool retrieves and how this data is formatted as Excel places it in your workbook. Your best bet in working with these options is probably just to experi- ment and see which option settings produce the best results.
Using Microsoft Query
The Query Wizard, described in the earlier chapter section “Using the Query Wizard,” provides you with a simple way to access external data. You should know, however, that the Query Wiz- ard is a tool you use to tell another program, Microsoft Query, how you want to query an exter- nal database. While the Query Wizard works well in most simple situations, you don’t get access to all of Microsoft Query’s power when you work through the wizard.
When you want more control over how a query operates, you can work directly with Microsoft Query. To work directly with Query, you also start by choosing the Data menu’s Get External Data command and then choosing the Get External Data submenu’s New Database Query command. As with a query performed using the Query Wizard, when Excel displays the Choose Data Source dialog box (see Figure 7-27), you select the database source.
To work directly with Query, however, you clear the Use The Query Wizard To Create/Edit Queries check box. When you click OK, Excel starts Microsoft Query.
To use Query, you follow a process similar to that used with the Query Wizard. For example, you start by identifying which tables you want to query, which columns, (or fields) you want to retrieve, how you want to filter, and how the data you retrieve should be sorted. Although Query provides less handholding than that of the Query Wizard, it offers you greater flexibility.
A more detailed discussion of Query is beyond the scope of this book, but let me make two final observations: First, before you attempt to develop expertise or fluency with Query, make sure that you won’t get further faster simply by learning how to use the external data source’s query capabilities. For example, Access is easier to learn (in part because it’s better docu- mented) and more useful than Query. It may not be a good use of your time, to learn Query so that you can then query an Access database. Instead, you might be better off learning Access.
Second, the Excel Help file provides detailed information about how to use Microsoft Query. To access this information, ask the Office Assistant a question such as, “How do I work with Microsoft Query?” Then explore the help topics that the Office Assistant provides.
Leave a Reply